ClefinCode WhatsApp User Guide
This user manual is designed to guide you through all aspects of using Clefincode Chat, from basic messaging to advanced features. Whether you're a new user getting started or an experienced user looking to leverage advanced features, this manual provides step-by-step instructions and helpful tips to enhance your experience.
Introduction
Tip: Clefincode Chat is a WhatsApp communication solution designed to integrate seamlessly with ERPNext. It offers a full suite of multimedia messaging capabilities, allowing your team to share pictures, videos, files, and voice clips effortlessly.
With an intuitive interface, Clefincode Chat facilitates easy adoption, enabling direct messaging or group conversations without complexity. The application supports dynamic participation in conversations, topic-integrated discussions, and guest messaging via a website support portal.
Tip: Communication Features:
- Direct and group messaging
- Multimedia messaging (pictures, videos, files, voice clips)
- User and doctype mentions
- Topic-integrated discussions
- Guest messaging via website support portal
Accessing Clefincode Chat
Tip: You can access Your ClefinCode Chat app in two ways:
- ERPNext Interface
- Mobile Application
Clefincode Chat is available as a mobile application for both Android and iOS devices:
- Download the Clefincode Chat app from Google Play Store (Android) or App Store (iOS)
- Open the app after installation
- You'll need to configure the app to connect to your organization's server on first use (This is covered in the next steps).
1. ### ERPNext Interface
You can access the Clefincode Chat by login to your account in your organization's ERPNext system.

2. The Clefincode Chat interface is designed to be intuitive and easy to navigate:
Main Components:
- Sidebar/Chats List: Shows all your conversations and groups
- Search Bar: Allows you to search for messages, contacts, or groups
- Message Area: The main area where messages are displayed
- Input Area: Where you type and send messages
- Top Bar: Contains search, settings, and profile options

Tip: ### Dark/Light Mode
ClefinCode Chat supports both dark and light modes to suit your preference.
The mode automatically adapts based on the theme of your ERPNext system.
3. Mobile Application
For Mobile Application, You should have an account created by your organization's administrator to be able to login to your account.
First-time Setup
If you're using the mobile app for the first time:
- You'll be prompted to enter your organization's server URL
- Enter the URL provided by your administrator
- Tap "Go"
- You'll be directed to the login screen
- Enter your username/email and password
- Tap "Login" to access your account

4. ### Login with Existing Account
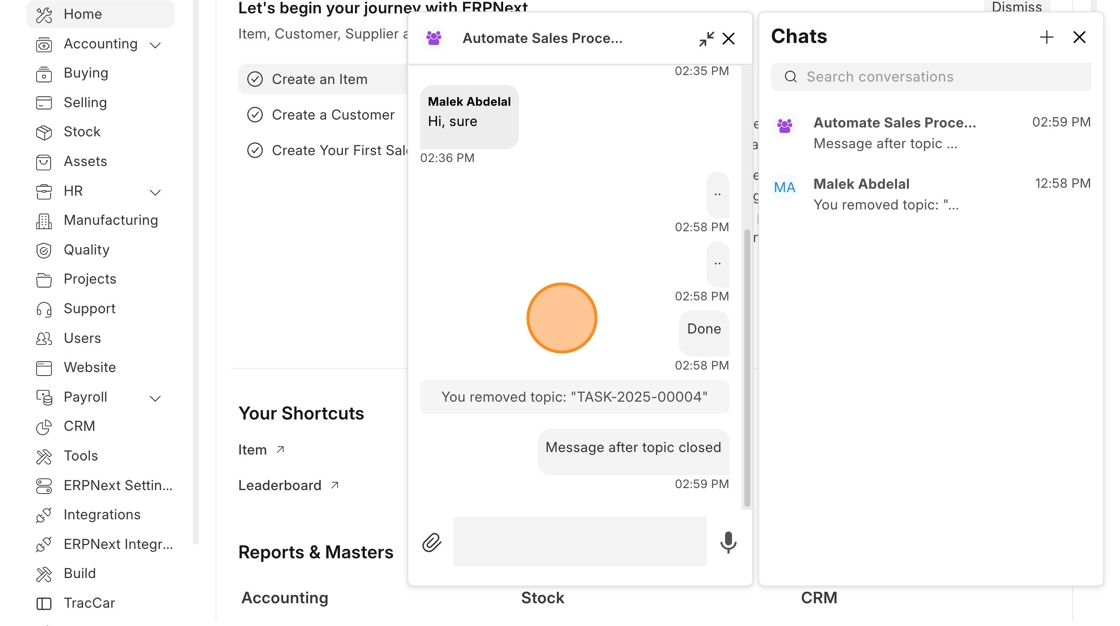
- Enter your username or email address
- Enter your password
- Tap "Login" to access your account

5. ## Mobile App Interface
Main Screens:
- Conversations List: Shows all your active conversations
- Conversation View: Displays the messages in the selected conversation
- Contacts: Lists all your contacts (You can access them by clicking on the top right "+" button)

Tip: The mobile app includes most of the features available in the web interface:
Messaging Features:
- Send and receive text messages
- Share images, videos, and files
- Record and send voice messages
- Use emojis and reactions
- Mention users and doctypes
- Set message topics
Conversation Management:
- Create new direct and group conversations
- Add or remove participants from groups
- Search for messages within conversations
Mobile-Specific Features:
- Push notifications for new messages
- Camera integration for taking photos directly in the app
Starting a New Conversation
Tip: In the following example we are creating a direct and group conversations from ERPNext interface, but the same process can be done using the mobile app.
There are 3 types of communication: WhatsApp, Email and Chat with another internal user.
6. ### Direct Messaging
To start a direct conversation with a contact:
- Click the "+" button in the conversations list
- Search for and select the contact you want to chat with
- The conversation will open, and you can begin sending messages
7. ### Group Chats
To create a new group conversation:
- Click the "+" button in the conversations list
- Select "New Group" option
- Search for and select the users you want to add to the group
- Click "✔️" button to create the group
- The group conversation will open, and you can begin sending messages
Note: You have the option to rename the group after you create it

8. ## Adding/Removing Group Members
Adding Members
To add new members to an existing group:
- Open the group conversation
- Click on the group name at the top
- Select "Add members"
- Search for and select the users you want to add
- Confirm your selection
Removing Members
To remove members from a group:
- Open the group conversation
- Click on the group name at the top
- View the list of members
- Find the user you want to remove
- Click the remove icon ⛔️ next to their name

Tip: Note: Depending on your role and permissions, you may not be able to add or remove participants from certain groups. Group creators and administrators typically have these privileges.
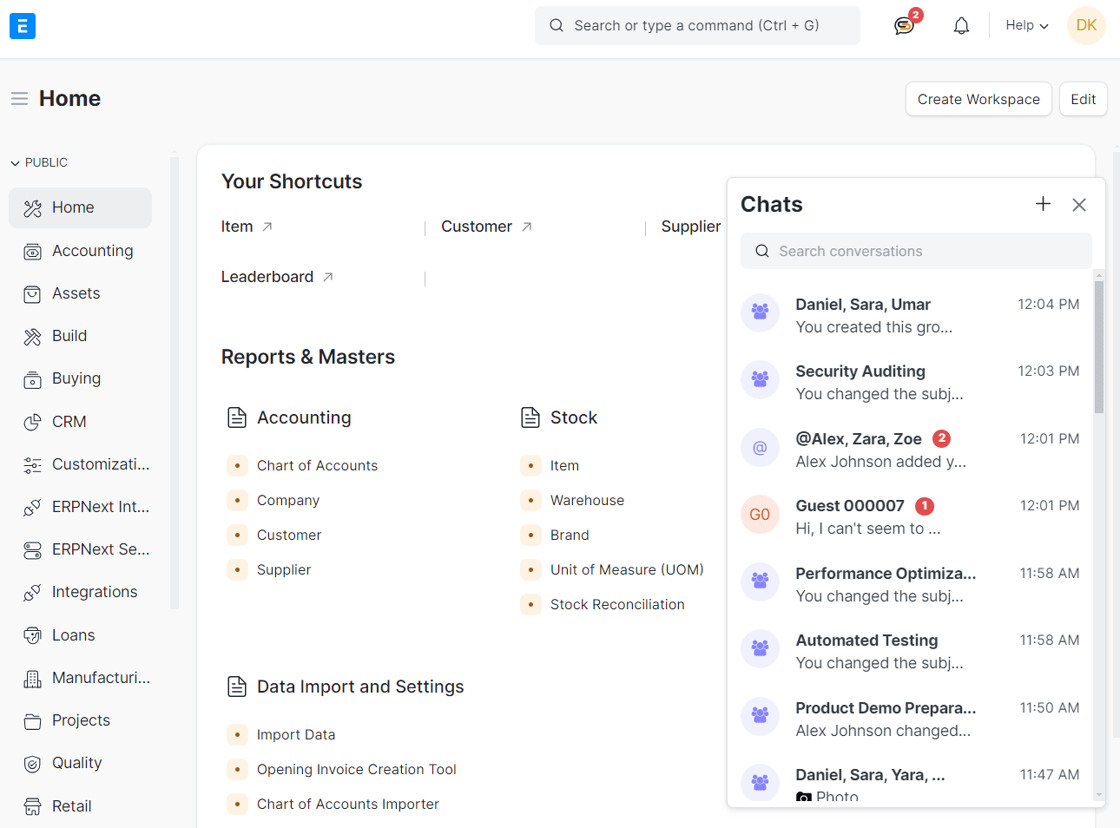
9. ## Receiving and Reading Messages
When you receive new messages:
- Conversations with unread messages will be highlighted in the conversations list
- A notification badge will show the number of unread messages as shown in the image below
- To mark messages as read, simply open the conversation and view the messages

Advanced Messaging Features
Tip: Clefincode Chat offers a variety of advanced messaging features that enhance communication and collaboration. This section covers multimedia messaging, users mentions, chat topics, and other advanced features.
Note: These features exist is both mobile app and ERPNext system interface.
10. ## Multimedia Messaging
Clefincode Chat supports various types of media to enrich your conversations beyond text.
- Sending Images
To send an image in a conversation:
- Click the attachment icon
- Choose an image from your device
- Click "Send"
Tip: You can also drag and drop images directly into the message input area in the ERPNext web interface.
- Sharing Videos
To share a video in a conversation:
- Click the attachment icon
- Choose a video from your device
- Wait for the video to upload (larger videos may take some time)
- Click "Send"
- Sending Voice Clips
Voice messages allow you to communicate quickly without typing:
- Click the microphone icon in the message input area
- When finish click on the send icon to share the voice message
- Sharing Files and Documents
To share documents and other files:
- Click the attachment icon
- Select "Document" or "File" from the options
- Choose the file from your device
- Wait for the file to upload
- Click on send icon

11. ## User Mentions
Mentioning users is a powerful way to get someone's attention in a conversation and make him able to view the conversation, especially in group chats:
- In the message input area, type "@" followed by the beginning of the user's name
- A dropdown menu will appear with matching users
- Select the user you want to mention
- Complete your message and send it
- The mentioned user will receive a special notification about the mention

12. Once you mention a user in your chat, they will be added to the "On going contributors" section as shown in the image below so they will have access to the chat and to contribute to it. You can remove the user as contributor by clicking on the "⛔️" icon of that user.
Note: You can view this from the group info by clicking on the group name at the top of chat.

Tip: Chat Topics
Chat topics are useful for discussing specific business documents, projects, or customer records without leaving the chat interface.
You can create a topic related to a specific document by mentioning the doctype name followed by ":" then a dropdown menu will appear listing all records of this doctype and you can select the desired record/document as described in the following steps.
- Messages of the topic will be organized under this topic and until the topic is closed.
Tip: Let's see how to create a chat topic ..
13.

14. Let's create a topic for this group ..

15. Type the doctype name, ex: @Task:
Note: You can use the doctype shortcuts instead of the full doctype name as configured in the ClefinCode Chat Settings doctype.

16. To see where the doctype shortcuts added and configured, go to ClefinCode Chat Settings using the search bar ..

17.

18. Here is the DocType Shortcuts table and you can see that a shortcuts added for Sales Invoice and Payment Entry DocTypes

19. Let's continue, select the specific document you want from the list ..

20. Once you send the message which includes the mentioned document, the topic will be created

21. Here is how the conversation will look like after the topic is created

22. This button is for closing the topic

23. This button allows you to rename the topic

24. By default, the topic is private and only the group members can see the messages of the conversation. You can make the topic public using this button

25. Here we made a simple conversation within this topic

26. For any document, you can see the chat topics connected with it at the bottom of the document in the comments section.
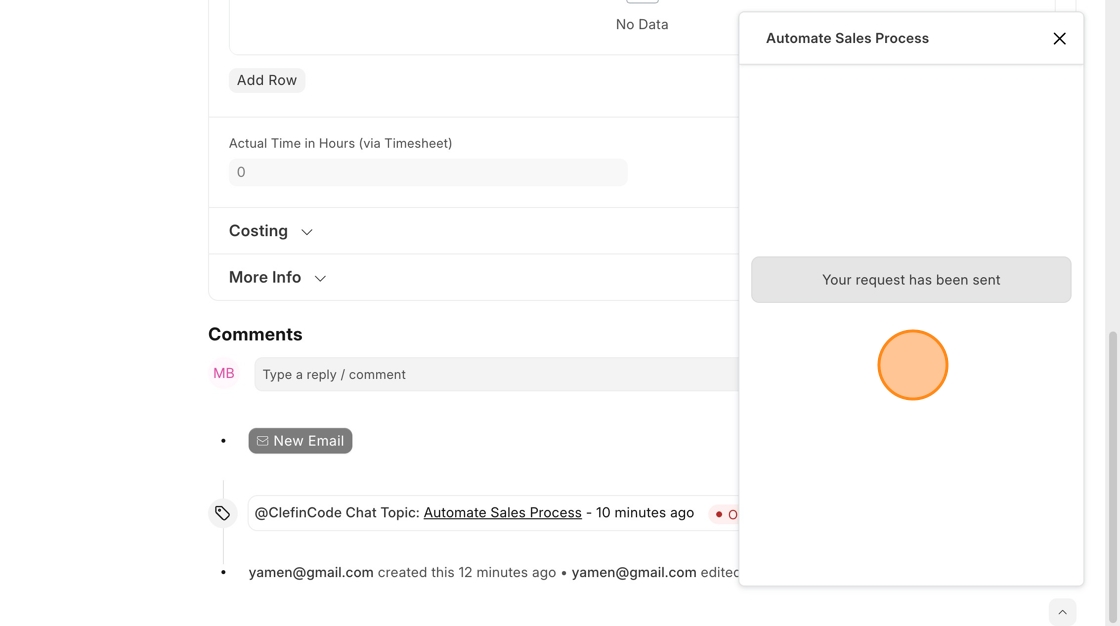
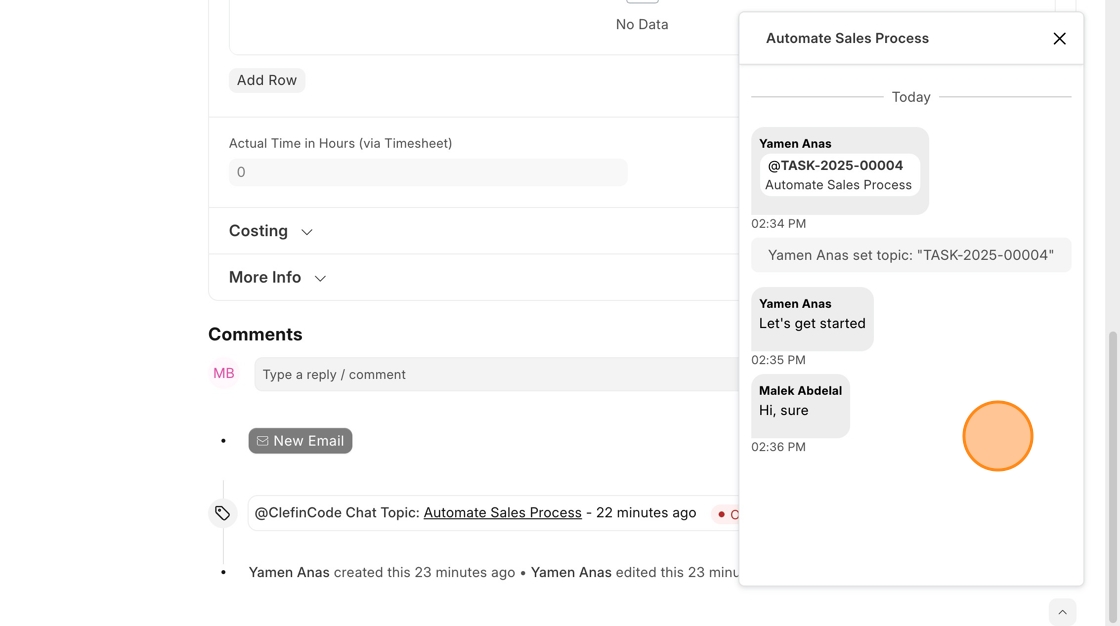
Let's see this topic we just created from the document interface. To do that, you can go to the Task list using the system search bar then select the document record, or you can directly view the document by clicking on the document name within the conversation as shown in this image.

27. Scroll down ..

28. Here is the topic, and it's open as we didn't close it yet ..

29. Click on it to view the conversation related to it ..

30. The full conversation between the creation of the topic until closing it will appear here

Tip: What if a user who is not a member in the group or a party in a conversation needs to view the conversation of this topic? Let's see how they can request an access to view it ..
31. They have to go to the desired document ..

32. Then find the topic ..

33. As you can see, they don't have access to view it, so they have to click on Request Access button

34.
35. The group members or the chat parties will receive a notification for that user access request ..

36.

37. The user who requested the access for the topic will receive a notification for access approval as well ..

38. Now he can access and show the topic conversation ..

39.
40. After finishing discussing about this topic, you can close it ..
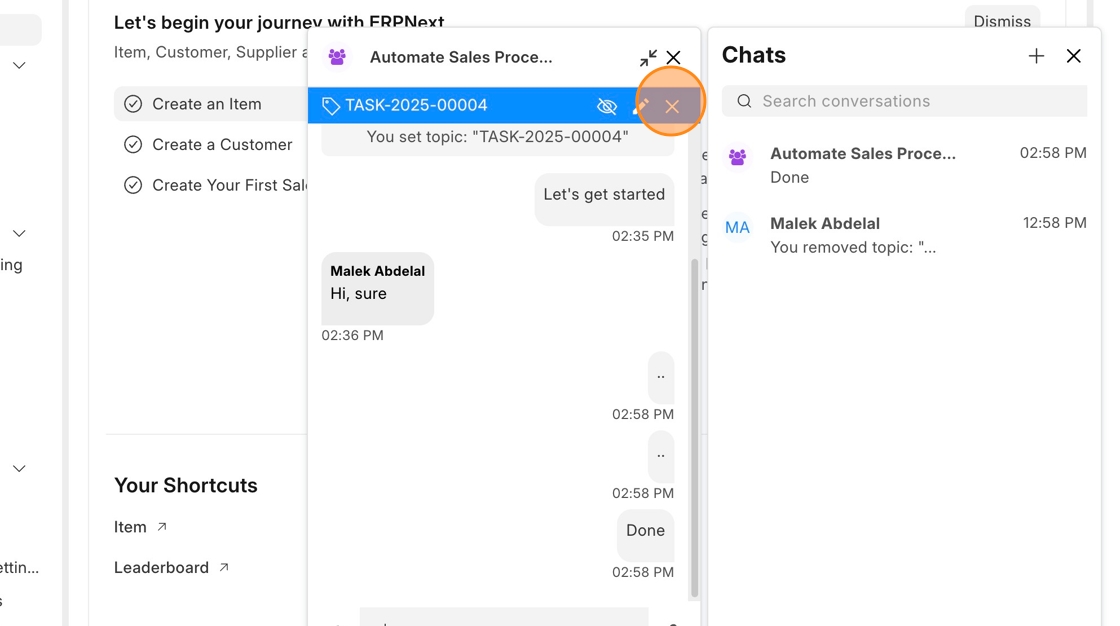
41.

42. Now if you send a message after closing the topic, actually it doesn't belong to the topic and will not appear when you view the topic from the document view, as shown in the following steps ..

43.
44.

45.

46. As you can see, the last message is not within the topic

47. And the topic status is Closed now.
